Here’s a step-by-step detailed guide to create an Amazon Seller Account (for India or globally). This includes the latest process and best practices
✅ Before You Start — Gather These Documents:
- Email ID – Not used on any existing Amazon account
- Mobile Number – For OTP verification
- Business Name – Individual/Proprietorship/Company name
- GST Number (for India) – Optional for individual category (only in some cases), mandatory for selling taxable goods
- PAN Card – Individual or Business PAN
- Bank Account Details – Account holder name, IFSC, account number
- Address Proof – Utility bill, bank statement, etc.
- Identity Proof – Aadhaar, Voter ID, Passport, or Driving License
🧭 Step-by-Step Registration Process
🟠 STEP 1: Go to Amazon Seller Central
- Visit: https://sellercentral.amazon.in (India)
or https://sellercentral.amazon.com (US/global) - Click on “Register Now” or “Start Selling”
🟠 STEP 2: Sign in or Create a New Amazon Account
- If you don’t have an Amazon account, create one using your email.
- Enter OTP received on your mobile/email to verify.

⭐⭐⭐⭐⭐
🟠 STEP 3: Business Information
You’ll be asked to provide:
- Business Type: Choose from:
- Individual
- Sole Proprietor
- Private Limited Company
- LLP / Partnership
- Your full name (as per documents)

Promocode: TECHHUSTLE20
🟠 STEP 4: Provide Business Details
- GST Number (mandatory if you’re selling taxable goods)
- PAN Card details (business or individual)
- Registered Business Address
- Upload required documents for KYC verification.
🟠 STEP 5: Set Up Your Store Name
- Choose your Store/Display Name (this is how customers will see you on Amazon).
- Example: “TechHustlePro” or “TechHustlePro1”
🟠 STEP 6: Pick Product Categories
- Select the categories of products you plan to sell:
- Electronics, Fashion, Home & Kitchen, Books, etc.
- You can add more later.

⭐⭐⭐⭐⭐
🟠 STEP 7: Add Bank Account
- Enter your bank account details where Amazon will deposit your payments.
- Must match the name on your PAN/GST.
🟠 STEP 8: Tax Information (India-specific)
- Verify GST & PAN numbers.
- Amazon will validate these in real-time or within 24–48 hours.
⭐⭐⭐⭐⭐
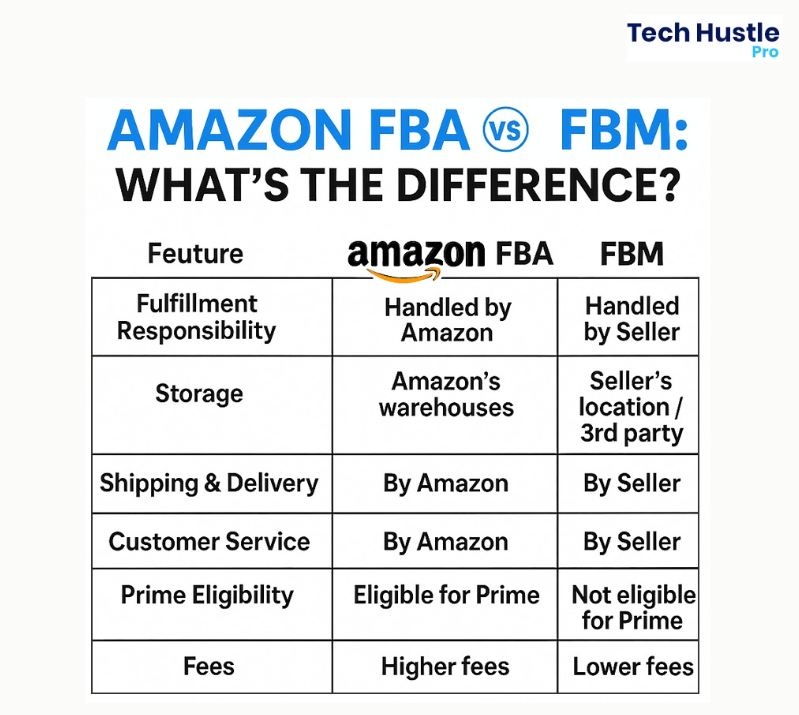
🟠 STEP 9: Choose Shipping Method
You’ll see options like:
- Easy Ship – Amazon handles pickup and delivery
- Self Ship – You manage shipping
- FBA (Fulfillment by Amazon) – Send products to Amazon’s warehouse; Amazon packs and ships
⚠️ If you don’t see FBA option during setup, complete registration first, then enroll in FBA separately via Seller Central dashboard.
🟠 STEP 10: Identity & Address Verification (via Video or OTP)
Amazon may:
- Schedule a short video call for KYC verification
- Or request document upload + OTP verification
✅ Once Approved – What’s Next?
- ✅ List Your First Product
- 📦 Choose Your Fulfillment Method (FBA, Easy Ship, Self-Ship)
- 💳 Set Prices & Inventory
- 📸 Add Product Images, Descriptions & Bullet Points
- 🚀 Go Live and Start Selling!
🔒 Important Tips for Smooth Setup
- Use correct and matching details across documents
- Keep your store name professional and unique
- Respond to KYC calls or emails quickly to avoid delays
- Regularly check your Seller Central dashboard for alerts
If you found this article informative, kindly consider 🔗sharing it with others and feel free to share your thoughts or questions in the 💭comments below.
Get More Tips
https://chat.whatsapp.com/HP2UTcu2jDoFnCL8LtO6VH


3 Comments
Well explained to create seller account. Also claimed 20% discount of Helium10. 👍 Thanks for sharing discount link.
Very informative content. Good tool to Amazon product research.